Preparing the MiniPC

 Before powering on the miniPC, be sure that no astro-related hardware is connected to it. Only connect a monitor (likely via HDMI) and a USB keyboard and mouse. I keep a small screen handy for emergencies in the field (the one I have uses the MiniPC USB port for power : LINK). You can also use a smaller keyboard and mouse (LINK), but anything you have available should work.
But again, please DO NOT connect any astro-equipment at this time.
- Power on the MiniPC
- If the miniPC doesn’t auto-login, answer the windows setup questions as they appear:
- Language, Location, Keyboard Layout, Name (I use ‘astro’), Password, and Security Questions, then let the windows installation complete.
- However, if the minPC logs in automatically using an account you did not setup, you may want to create a new account.
- Go to Settings > Accounts > Other users and click Add account.
- Setup the Account Name/Password/Security Questions/etc.
- Expand the new account and make it an Administrator.
- Next, click on the Windows Start Button, then click on the current user name, and click Sign Out.
- Then, log back in as the new account you just created and let setup complete.
- As one more final step, go back in to Settings > Accounts > Other users to expand and remove the old account from the miniPC.
- If the miniPC doesn’t auto-login, answer the windows setup questions as they appear:
- Connect to the Internet
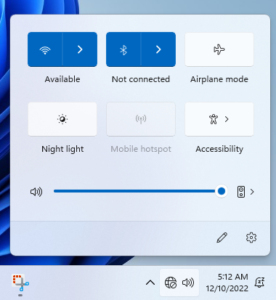 Click on the Globe icon at the bottom right corner of the screen, then click on the right-arrow next to the WiFi symbol and select your desired WiFi network from the list that is presented. Click Connect and enter the security key for this network.
- Now, (optionally) let’s get this webpage open and bookmarked on your miniPC system so you can follow this install procedure a bit easier without having to continuously go back and forth between 2 computers/keyboards/mice.
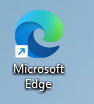 Open the Microsoft Edge web browser and complete its initial startup process.
- Navigate to www.patriotastro.com
- Click on the Favorites button (Star Icon) to the right of the web URL.
 This can come in handy later if you choose to use/download some of my other original content such as my Downloadable Advanced Sequencer Templates or my Customizable End Of Night Scripts. If you ever need to come back to my site from this computer, maybe after a reboot or days from now, to download additional content, simply click the Star Icon to access your favorites, then click on the favorite we just added.
 OK, back to work, we have a long way to go. Right-click on the clock at the bottom right of the screen and click Adjust date and time.
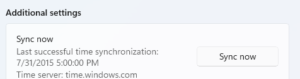
 Set your correct Time Zone and then scroll down and click Sync.
- NOTE: There are several upcoming steps that will have you navigating the Windows Settings menu. If you are using a small screen on your miniPC, the Settings Navigation Menu may be minimized. To expand the minimized navigation menu, click the 3-bar menu button at the top left .

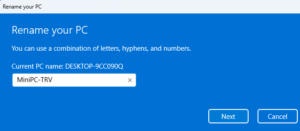
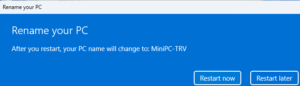
- We can now rename this PC.
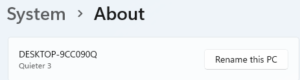 Staying within Settings, on the navigation menu, click System then
scroll down and click About. Once here, verify the operating system version, RAM, etc., then click Rename this PC (at the top).
- I’ll rename my miniPC to “MiniPC-TRV” since this is for my travel rig. After changing the name, click Next and select Restart Later.
Updating Windows
Keeping windows patched and up to date will be a critical ongoing responsibility of yours. Since this miniPC will be used during non-traditional hours (overnight), we need to adjust a few default settings to ensure our system doesn’t enforce an update initiated reboot at 3:00AM just as our target is overhead. Windows provides us the capability to define “Active Hours” which is a range of time where the system will attempt to avoid rebooting with the assumption that we are actively using the miniPC. Before we customize the Active Hours, we should first update our operating system with the latest patches and security fixes.
 Staying within the Settings Menu, click Windows Update from the navigation menu.
Click “Download and Install All”.
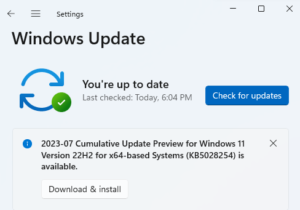 Keep cycling through downloading/installing updates, rebooting, logging back in, and updating again until it eventually says “You’re up to date”.
Stay on the Windows Update page and scroll down to Advanced Options.
Click Active Hours, then click Adjust Active Hours Manually.
 I like to set my “Active Hours” from 6PM to 9AM in order to limit the likelihood of a Windows Update-based reboot to occur during an overnight imaging session.
Pre-Installing .Net (for ASCOM)
Almost every astrophotographer out there who is using a miniPC to control their telescope knows that one software package will be required, and that is ASCOM Platform. One of the requirements of that software package is that Microsoft .Net Framework v3.5 is installed on the Windows system. Rather than waiting for the ASCOM Platform installation, let’s take care of that component right now.

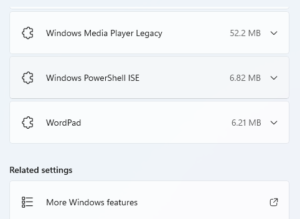 Still within Settings, go to Apps on the navigation menu.
- Click Optional features, then click More Windows Features.
- Select .Net Framework 3.5, then click OK. When prompted, click “Let windows download the files for you” so Windows can complete the installation.

- Close when done.
Windows Power Settings
Windows provides a number of configuration options related to power consumption and conservation. We should modify a couple of these settings such that our system remains available throughout the night and ensures power/connectivity is consistently available to our USB attached hardware. (Even while unattended for longer periods of time throughout the night.)
 Let’s begin this part of the process with a clean slate.
- Close any currently open windows and configuration pages (other than this webpage of course).
- Click on the Windows Start Button, then Search for and Open the Windows Control Panel.
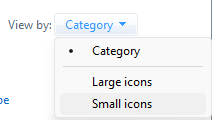
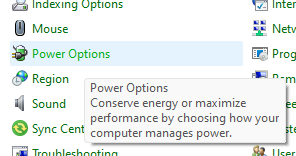
- Click View by: Small icons at the upper right of the Control Panel window, then click on the Power Options icon.
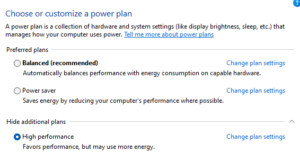 Click Additional Plans, then select High Performance.
 Once here, click Change Plan Settings.
- Set Turn off the display to “Never”
- Set Put the computer to sleep to “Never”.
- Then, click Change Advanced Power Settings.
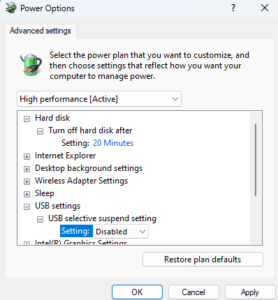 Expand USB Settings, then expand USB Selective Suspend, and change it to “Disabled”, then click OK.
- Finally, click Save Changes then close the Control Panel window.
Customize Windows
Prior to moving on to the Astro portion of the install, there is still a bit of cleanup I like to do within Windows.
- Close all open windows.
- Your desktop may have several shortcut icons that you’d like to remove. Maybe they were pre-installed or were a result of your recent application installs.
- Drag any desktop icons/shortcuts you’d like to remove over and into the Recycle Bin.
- You can always do this later of course, but I like to tidy up before we start adding a bunch of Astro Software.
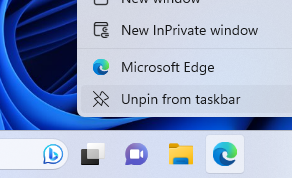 There may be some items on your taskbar along the bottom that you’d like to remove.
- Right-click on the undesired taskbar items and click Un-pin from taskbar.
- You may have noticed that some of these icons cannot be removed this way, but don’t worry, I’ll help you get rid of this infestation of icons right now!
- Let’s go back into Settings by clicking on the Windows Start Button, then clicking Settings.
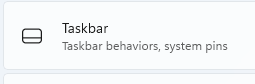 Now, click on Personalization from the Settings Navigation Menu. Remember from earlier, If you don’t see the navigation menu because you are using a small screen, click on the navigation menu option at the top left of the settings window to reveal the missing menu.
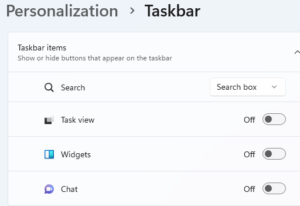 Once in Personalization, scroll down and click Taskbar and toggle all undesired taskbar items to Off.
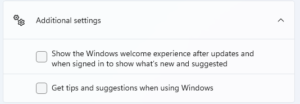
- There are also a couple annoying messages that Windows will present from time to time that I prefer to disable. You can do this too!
- Go to System in the Settings Navigation menu, then click Notifications.
- Scroll down to, and click on, the Additional Settings option.
- Uncheck the boxes.
- At this point, I also like to modify the Windows Desktop color palette to make it a bit easier for nighttime/astro use.
- Go back into Personalization in the Settings navigation menu.
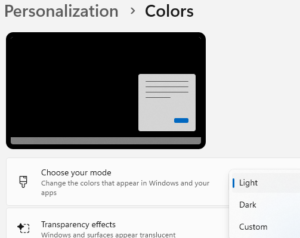 Click on Background. I prefer to set this to a solid color of black but you can customize it any way you prefer.
- Head back to Personalization once again, but this time click on Colors and then change the Mode to “Dark”.
Enable Remote Desktop
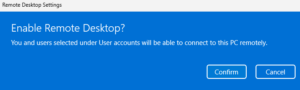
With our miniPC Windows install customized and ready to move forward, the next step is to enable Remote Desktop so we can remote control this computer from inside the warmth (or cool) of our house. Since I am using a “Pro” edition of the Windows operating system, I have access to the build in Remote Desktop Client/Server capability. If you do not have a Pro edition, you will need to find and use an alternative remote control software package such as TeamViewer or VNC as some common examples. If using Windows 11 Pro, you can use the steps below to enable Remote Desktop directly within your OS.
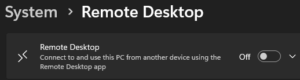
- We should still be within the Windows Settings page, if not, return to Settings now.
- Navigate to System, then click Remote Desktop.
- Enable Remote Desktop.
- Click Confirm when prompted.
Reserving an IP Address
As of right now, we “could” remote control our miniPC, which is great, but the small problem we still have is that we may not always know where it is located on the wireless network (by IP Address). You see, every time your miniPC boots up, it will talk to your wireless network and receive an available IP Address to use on the network for that session. Unfortunately, the IP address assigned to the miniPC could be different every time it connects. For us to consistently remote control your miniPC night after night, we need the assigned IP address to be consistent.
Every WiFi/Router/Gateway manufacturer does this a little differently. You will need to Google something like “<model_of_your_gateway/wifi/router> DHCP reservation” or “<model_of_your_gateway/wifi/router> reserve IP address” for the correct device specific steps to accomplish this. I happen to use an EERO home mesh WiFi system which is easily controlled from an application on my phone.
In order to reserve an IP address for your device, you may need:
- The Name of the device.
- You should already know the name of the miniPC since you just renamed it.
 The miniPC Networking Interface’s MAC Address.
- If you are not familiar with the concept of a MAC Address, there are a couple of ways to find this information for your miniPC. An easy way to locate an interface’s MAC Address is to do the following.
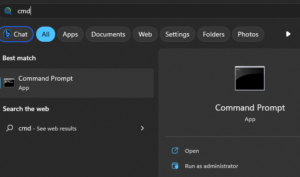
- Click the Windows Start Button and search for “cmd”, then open the Command Prompt App.
- Type “ipconfig /all” in the Command Prompt window, then press Enter.
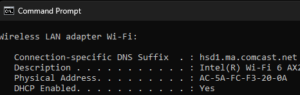 Scroll down until you see the Wireless LAN Adapter section and find the Physical Address line.
 - This is your miniPC WiFi Adapter interface’s MAC Address.
- Depending on the manufacturer of your WiFi/Router/Gateway, you may need to use dashes, colons, or no spacing at all between the list of 12 hexadecimal (0-9 and/or A-F) characters.
- If you are not familiar with the concept of a MAC Address, there are a couple of ways to find this information for your miniPC. An easy way to locate an interface’s MAC Address is to do the following.
- You now have the information you need to complete the reservation process in your WiFi/Router/Gateway.
 As a quick example, on some Comcast XFINITY systems, you login to your home gateway, Find your new miniPC device in the list, click Edit, and change it to a Reserved IP.
Great (hopefully), you have reserved an IP address for this new miniPC. I suggest testing that it is actually functional before you proceed any further.
- Reboot your MiniPC.
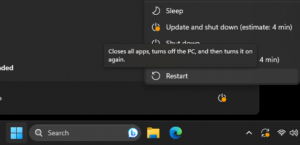 Click on the Windows Start button.
- Click on the Power button icon.
- Select Restart or Update and Restart.
- You may have additional updates to install by the time you get here… Thanks Microsoft!
- After the miniPC reboots
- Log in and re-open the Command Prompt
- Windows Start Button > Search for “cmd”, then open the Command Prompt App
- Type “ipconfig /all” and verify your WiFi interface has in fact been assigned the IP Address you reserved in your gateway.
- Log in and re-open the Command Prompt
Assuming the IP address was assigned as expected, great! If not, you may need to troubleshoot this process until it is functional. While technically not 100% required, ensuring your miniPC IP address is consistent through reboots will dramatically simplify your connection process every evening, so I suggest getting it working now if possible.
Hostname Resolution
It is less likely you will remember an IP address than an easy to read hostname when attempting network connectivity. In this next series of steps, we will configure local resolution of your miniPC’s hostname (in Windows) so you can quickly connect to it for any number of reasons such as Remote Control, File Sharing, etc. While the steps here will not configure any of those services, they will allow you to identify the computer on the network as the destination for those types of connections.
You should now move over to the other Windows computer that you plan on using to remote control the new miniPC. (There are of course ways to do this in other operating systems, but I will only demonstrate this capability in Windows today.)
Once there, you may want to add the Patriot Astro website to your web browsers favorites on that system as well, but at least temporarily open this webpage on that machine and pickup from this point here. You can use the Table of Contents “Hostname Resolution” Link at the top of this page to bring you right back to this location in the document.
Go to your other machine and do that now… I’ll be right here when you get back.
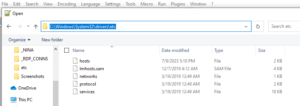
Welcome back, nice remote access machine you’ve got here… Let’s set it up so you can easily access the miniPC each evening. We need to open and edit this Window’s systems HOSTS file to add an entry for your new MiniPC. I like to use Notepad++ for editing files in Windows, but you can use whatever text editor you like. In order to edit the HOSTS file in Windows, you need to perform this action while running your text editor as administrator.
 Right-click the Notepad++ shortcut icon and select Run as Administrator.
- Click Yes when prompted.
- Open this file: C:\windows\system32\drivers\etc\hosts
- Now, add a new line to the end of this file, it should look what you see in this image with the format being the IP Address then a tab as spacing and then the machine name.
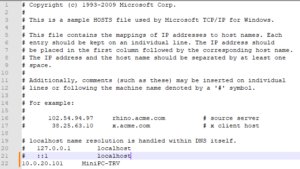 10.0.20.101 MiniPC-TRV
- Now, add a new line to the end of this file, it should look what you see in this image with the format being the IP Address then a tab as spacing and then the machine name.
- Save the HOSTS file, and close your text file editor.
Test/Simplify Remote Access
Now that we have remote access enabled on the miniPC, a consistent IP address assigned, and local name resolution configured, we can proceed by testing an actual remote access connection to the miniPC from your remote control system.
 On the computer that will be controlling the remote miniPC, Search for “Remote Desktop Connection”.
- When the application opens:
- Click Show Options
- Then, enter the hostname you placed in the HOSTS file into the Computer field.
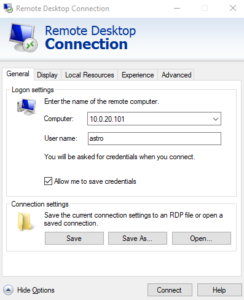 Also, enter the username into the User Name field. (This is the user account you created on the MiniPC)
- Then, check “Allow me to save credentials”.
- Now, click Save As.
- I prefer to save all of my remote connections in a consistent folder. I use an _RDP_CONNS folder in my Documents for this but you can place it anywhere you like.
- Name it something you will recognize, I will call mine miniPC-TRV to mirror the name of my new miniPC.
- Now, click Connect.

 Assuming everything is working, you will be prompted about trusting this remote connection.
- Click the “Don’t ask me again…” checkbox. Then, click Connect.
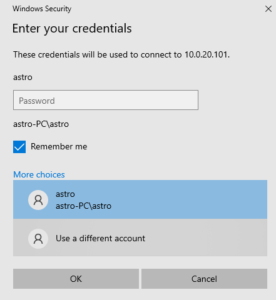
- You will be prompted for credentials, which we need to modify, so click More Choices, then click Use a different account.
- Type the name and password you created on the remote miniPC during setup which for me was astro/astro and leave Remember Me checked then click OK.
- You will be prompted about the identity of the remote system, click “dont ask me again…” then click Yes.
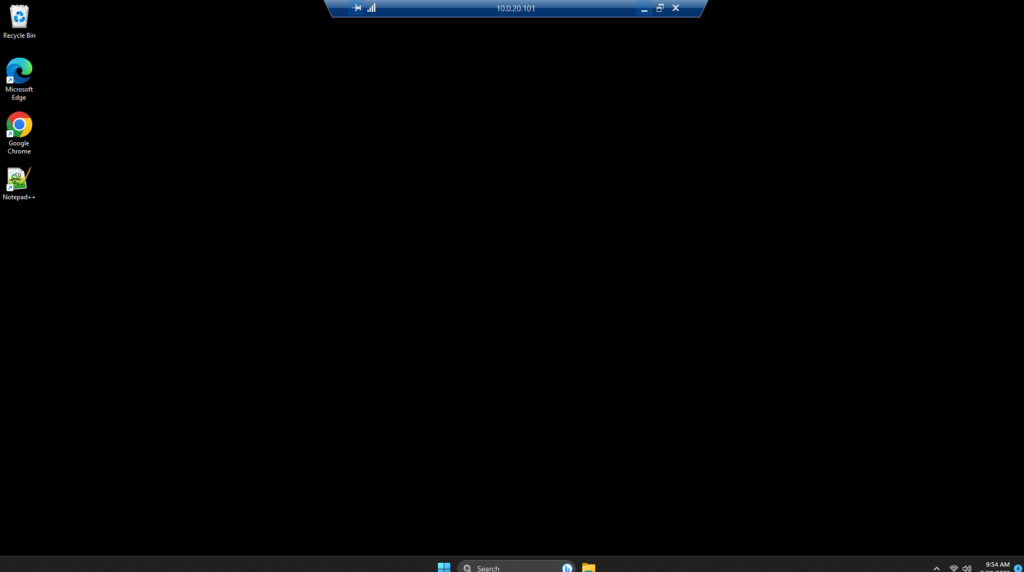
- You should now be connected to your new MiniPC as illustrated by the remote client bar at the top of the screen.
Perfect! You are sitting at the computer you will be using for remote access and are connected to the miniPC via a Remote Desktop connection. In case you are not yet familiar with the Windows Remote Desktop application, let me show you how to logout of that system without shutting it down (in case you ever need to do that).
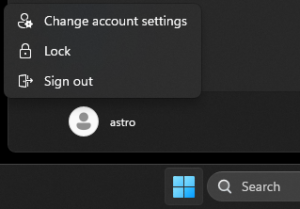 In the remote desktop connection window, click on the Windows Start button.
- Then, click on the username (astro for my system).
- Then, click Sign Out.
- This will sign you out of the remote system and close your remote desktop connection.
Alright, one more set of steps related to Remote Desktop. This next part is optional but I like to create a shortcut for remote access to this system onto the desktop of the remote access computer.
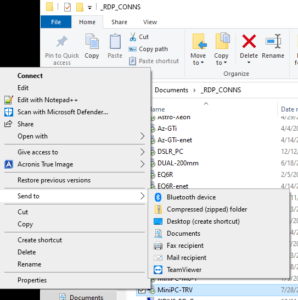 In the Windows File Explorer, navigate to where you saved the remote session (for me, this was …\Documents\_RDP_CONNS\…)
- Right-click the saved session file
- Select Send to > Desktop (create shortcut)
- You should now see a shortcut on your remote access computer’s desktop.
 I’ll shorten the shortcut name by removing the “- shortcut” portion.
- Our ability to access the remote system should be much faster now that we have everything streamlined.
- Double-click on the shortcut.
- You should be taken right into the remote miniPC without any additional prompts (ideally).
- Stay connected to this computer for now.
- If the system connection seems “laggy”, you can check the signal strength by looking at the Remote Connection bar at the top of the window.
- There is a strength meter at the top left near the pin (similar to the meter on a cell phone).
Hopefully, you have a strong remote desktop connection signal which will make your connection more stable. You will need to check this later as well once we eventually relocate the miniPC to the location you will be imaging from. If, at that point, you have signal strength issues, resulting in poor connection via remote control, you may need to consider other ways to improve your connection strength such as deploying a mesh WiFi system with a wireless hotspot closer to the miniPC, or possibly using an wired ethernet connection instead of WiFi.
Preparing for Astro Downloads
Since you are still connected to (and remote controlling) your miniPC, let’s continue getting it ready to control your astrophotography equipment. Remember, at this point, there should still NOT BE ANY astro-equipment connected to your miniPC. You can perform these next steps via the remote desktop connection, but using a local connection to the miniPC is also OK if you prefer.
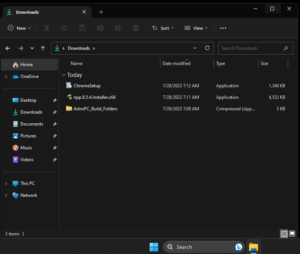 Open the Windows File Explorer application by using the icon near the Windows 11 search bar at the bottom of the screen, and then click on the Downloads folder.
- You should see the applications you downloaded and installed earlier.
- You should also see the AstroPC_Build_Folders.zip file we downloaded from the www.patriotastro.com website.
- Right-click the AstroPC_Build_Folders.zip file, then select Extract All, and finally click the Extract button to complete the process.
- Drag the new File Explorer window to the right so it to the right and the Downloads folder is on the left.
- The point of this hierarchy folder system I have provided to you is so you can organize your Astro Downloads as well as keep a copy of them in case they are ever needed again for reinstallation or repair within windows.

- The point of this hierarchy folder system I have provided to you is so you can organize your Astro Downloads as well as keep a copy of them in case they are ever needed again for reinstallation or repair within windows.
- To make things a little bit easier moving forward (trust me on this one), we will modify some of the Windows 11 default file sorting/display settings:
- On the right window (our astro-folder hierarchy), click Sort on the File Explorer ribbon bar, then select Group By, then change the setting here to “None”.
- Next, at the top of that same File Explorer window, click on the 3 dots (more options), and click Options.
- Once in here, click the View tab, then click the Apply to Folders button, then click Yes to confirm the change, and lastly click OK to complete the process.


- Once in here, click the View tab, then click the Apply to Folders button, then click Yes to confirm the change, and lastly click OK to complete the process.
- Now that we’ve sorted that out… Let’s file away some of the downloads from earlier.
- In the AstroPC_Build_Folders file explorer window, navigate into the _SW_INSTALLERS then OTHER_INSTALLS folder.
- Now, you can move all of the previously downloaded files (other than the Folder we are currently using) into the OTHER_INSTALLS folder (Such as Acrobat and Chrome).
- If you prefer to move this hierarchy out of the Downloads folder, you can easily move it anywhere else you prefer on the system. I tend to move mine to the Documents Folder on the miniPC for safe keeping.
As we continue onward throughout my download and installation process, I like to keep open the Downloads and Hierarchy File Explorer windows. This allows me to easily move items into the hierarchy for long-term storage as I complete each install process.
Downloading/Installing Session Management Software
It’s finally time to download any Astro software we think we may need on this miniPC. This will eventually include imaging session control software packages and any necessary hardware drivers. It’s OK if you forget something along the way. While going through this process, you can choose to download everything first, then install everything later. Or, install each item immediately after downloading it. I’m going to recommend that you download everything first and install later. The reason I recommend doing it this way is because it will make testing and validation of each hardware component easier (not to mention we need to have our miniPC near our telescope in order to connect the hardware, and this location may be located further away from your WiFi access point, as a result, have a weaker connection). So, let’s download everything while we have the strongest internet connection possible which will improve our download speeds (some of the downloads are quite large).
 To understand what I have provided to you, let’s dig a bit deeper into the AstroPC_Build_Folders hierarchy. In file explorer, go to ..\AstroPC_Build_Folders\_SW_INSTALLERS\_ASTRO_INSTALL\_SW_APPS
I have an install list (and order) I prefer, but feel free to adjust this to suit your own needs. I will not be able to show all download and installation steps for each package, but I will try to mention anything important.
Follow along if you like, or do it on your own (and then rejoin this document further down). In each case, I will:
- Download the necessary software/files.
- Extract the files to a specific location as required, or directly into the Downloads folder.
- Install the unzipped software, or relocate the files as required.
- Delete the original downloaded zip file.
- And finally, move the extracted installer into the AstroPC_Build_Folders Hierarchy (in case I ever need it again).
As a side-note, this video here covers my AstroPC build process in detail if you would prefer to watch some of the process. Here are the imaging session management software packages I will download today:
- NINA (Imaging Session Control for DSO)
- Available at https://nighttime-imaging.eu
- Click Download, then Select from what is currently available (Stable/Beta/Nightly)
- Don’t forget to scroll to the bottom of the NINA Download page and also download both the Sky Atlas and Offline Sky Map files (these are large!)
- If you chose the Nightly (3.x) version of NINA, you will also need to download some .Net7 packages from Microsoft (Maybe watch this video later when installing NINA)
- Install and Execute NINA prior to extracting the other 2 supporting files. (Running NINA at least one time is required for the file system objects to be created.)
- Once ready to extract the Sky Atlas, I like to extract it into the “Documents\N.I.N.A.” folder and then tell NINA where I placed it on NINA’s Options > General configuration page within the application.
- Once ready to extract the Offline Sky Map, you should extract this into “%localappdata%\NINA” which is where NINA already expects these files to be located.
- SharpCap (Imaging Session Control for Planetary/Lunar/Solar)
- Available at https://www.sharpcap.co.uk/
- I download the latest v4.x 64bit version, install it, and then Launch it one time to complete the setup process.
- You can add your SharpCap Pro License to the software now or later (if you have one).
- ASTAP (Plate Solver)
- Available at https://www.hnsky.org/astap.htm
- Download and install the 64bit program file.
- Also download and install at least one of the Star Databases (I will use D50).
- PHD2 (Guiding)
- Available at https://openphdguiding.org/downloads/
- I prefer to click on the Development Snapshot Build link and use the latest Snapshot (Dev6 as of this document) since this is recommended by the creator.
- Install PHD2, but DO NOT Launch it yet. (Uncheck this option at the end of the installer.)
- Extras (Planetarium, etc)
- Download anything else you may need.
- I’ll download and install the latest version of Stellarium (as an example of additional software you may choose to add).
- You can customize the Stellarium desktop shortcut if you prefer this to open within a window on the miniPC rather than full-screen.
- Right-click the shortcut, then from the Shortcut tab, edit the Target by adding “–full-screen no” (without the quotation marks) to the end of the line.
Downloading Astro-Hardware Drivers
With your Astro Session Management Software installed, we can move on to downloading all required software and drivers for our Astro hardware. Let’s download those components now (but not yet install). The list of software/drivers you need will differ per person and per setup. You need to download the components you require for your own equipment. You will almost always begin by downloading the ASCOM Platform software, then moving on to any hardware specific requirements. These downloads may include: Native Windows Drivers, ASCOM Drivers, and/or any Supporting Software applications for each individual piece of hardware. In some cases, you may also need to download USB serial drivers or other pieces, so pay close attention to your hardware requirements along the way. It should be noted that some of the software and driver packages today come bundles as large monolithic downloads which may simplify the number of files you need to download. Remember, you are only downloading software and drivers at this time, DO NOT INSTALL ANYTHING YET! (Sorry for yelling)
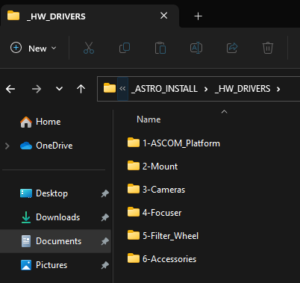 In preparation for these hardware related Downloads, let’s again navigate into the AstroPC_Build_Folders hierarchy. Go to ..\AstroPC_Build_Folders\_SW_INSTALLERS\_ASTRO_INSTALL\_HW_DRIVERS
I’ll download the following:
- ASCOM PLATFORM SOFTWARE
- MOUNT DRIVERS/SOFTWARE
- This could be something like Green Swamp Server, EQMOD EQASCOM, or SynScan mount control software as examples.
- Don’t forget you may require an additional driver for your USB Serial connection (such as FTDI drivers).
- CAMERA DRIVERS/SOFTWARE
- Download all Native Windows and ASCOM drivers for the Primary and guiding cameras you may use on this system.
- Remember, you may use this system with various cameras depending on your targets (Planetary/Solar/DSO).
- FOCUSER/FILTER-WHEEL/FLAT-PANEL/ROTATOR/DOME/WEATHER-SAFETY/ETC DRIVERS/SOFTWARE
- Download all remaining software/drivers as necessary (Native and/or ASCOM)
Installing and Testing Astro-Hardware
Before we begin, and I think you have heard me say this before,… NOTHING should be connected to the MiniPC yet. It is important that you follow along with my installation guidance in this next section so you can have the best possible (and most efficient) installation and configuration experience. This process will be fairly specific: We will install drivers for a specific piece of hardware, connect that device to the MiniPC (likely via USB), possibly check in Windows Device Manager to see if a COM Port was assigned to this component, then test/validate the device’s connectivity. We will do this on a device by device basis, one at a time, so we can control and observe each specific outcome in a controlled manor.
- ASCOM PLATFORM
- If you need to install ASCOM drivers, always install ASCOM Platform first, always…
- Generally, the installer defaults are fine unless you know otherwise.
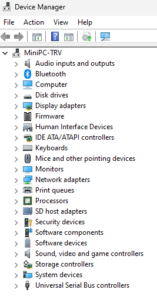 OPEN WINDOWS DEVICE MANAGER
- Click on the Windows Start Button, search for Device Manager, and Open it up
- You are not likely to see any COM Ports assigned yet
- Keep this window open so we can refer to it later
- MOUNT INSTALLATION AND TESTING
- Run through the installation of your Mount Software and Drivers.
- Remember, this may include USB Serial Drivers as well as additional supporting software packages such as EQMOD EQASCOM, Green Swamp Server, or SynScan to name a few.
- To test the mount:
- Connect the mount to your miniPC ensuring this is the only device you are connecting at this time.
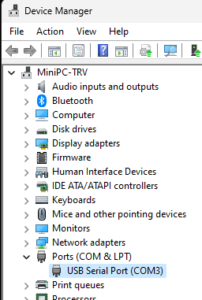 Refer to the Device Manager to see if anything has appeared (such as a COM Port assignment)
 - In my case here, you can see the mount (using a USB-Serial Cable) has connected to Windows as COM3.
- Since the mount I am using in today’s demonstration is a SkyWatcher AZ-GTi mount in EQ mode, I could also open the SynScan Pro application to validate I can connect to the mount. You should validate using your own software.
- You may need to perform additional configuration at this time depending on your connection method, such as providing GPS coordinates for your location, etc.
- Because this is a mount, once connected, a simple validation process could be to slew in both RA and DEC to verify movement.
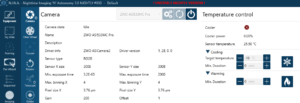
 You could also open NINA at this point and connect to the mount at Equipment > Telescope as further verification of a successful connection.
- GUIDE CAMERA INSTALLATION AND TESTING
- If you will be using a guide camera, I suggest you perform these next steps in order to simplify some additional camera connection complexity that can arise, especially if you happen to use the same vendor for both your guiding and primary cameras.
- Install your Guide Camera software/drivers (Both Native and ASCOM Drivers if you have both)
- Since I am using ZWO Cameras, I will install the ZWO Native Windows Camera Drivers, the ZWO ASCOM Drivers, as well as the ASIStudio software.
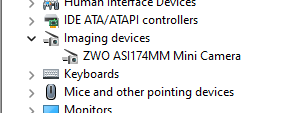 I will now physically connect the Guide Camera (and only the guide camera if possible) to the miniPC.
- I can monitor the camera connectivity via Windows Device Manager and see my ZWO ASI174mm-mini connected as an imaging device.
- Let’s now install the PHD2 Guider software and configure it to use this camera. (You may have moved this software into the older hierarchy earlier. Locate it and complete the installation. Let it Launch the PHD2 software when the installation completes.)
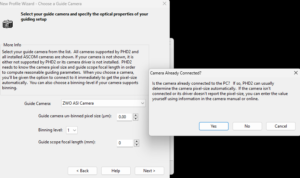 The PHD2 First Light Wizard will automatically start.
 - Click Next, then Select your Guide Camera (ZWO ASI Camera) from the dropdown and tell it that it is connected to the system already. If you have more than one camera connected from the same vendor, this can get tricky so try to avoid this situation if possible.
- The wizard should detect some of the parameters from the camera automatically but you will minimally need to provide the focal length of the guide scope. Since I am using a ZWO Mini Guide Scope, my focal length is 120mm. You can complete the wizard by defining the Mount, AO, and Rotator if you have any (although they are likely not yet installed, so you may need to come back later).
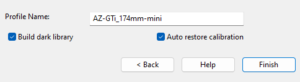 I’ll name the profile, and tell it to both build the dark library as well as auto-restore calibration.
- I’ll complete the dark library build to complete the install/wizard process.
- I can further test the guide camera by connecting it to PHD2 and removing the guide scope cover to show I am getting light into the system.
- Testing the Guider:
- I’ll also test PHD2 by connecting it to NINA in Equipment > Guider. Don’t forget to define the PHD2 application path in NINA before connecting.
- I’ll also test PHD2 by connecting it to NINA in Equipment > Guider. Don’t forget to define the PHD2 application path in NINA before connecting.
 PRIMARY CAMERA INSTALLATION AND TESTING
- Next, we can install your primary camera software including Native/ASCOM drivers and any additional software as required or desired for this camera.
- In my case, my primary camera is the same vendor as my guide camera so I have nothing additional to install.
 I can now test the primary camera by connecting it to USB and validating it in NINA via Equipment > Camera.
- If PHD2 complains for any reason, it may be trying to connect via the wrong camera. Force the correct camera to connect to the PHD2 profile if necessary.
- COMPLETE ALL ADDITIONAL HARDWARE INSTALLATIONS
- Make sure to use the time tested process of:
- Install Drivers/Software
- Connect the device to USB
- Validate the device (Device Software, Windows Device Manager, or NINA, etc)
- Move the software/Drives into the hierarchy of folders as a backup
- Make sure to use the time tested process of:
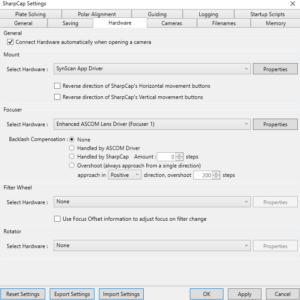 Once all hardware has been installed and tested, you can also assign this same hardware to profiles within other imaging session management software as desired. As a quick example, I will start SharpCap and add my hardware devices to that software package so it is ready when I eventually need it later for a planetary or solar imaging session.
Where to Go from Here?
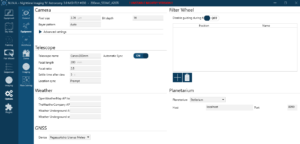 If you’d like to continue with NINA installation and profile configuration, I suggest watching these 2 videos of mine ( 1 | 2 ). You will need to configure a some additional parameters in NINA such as the following:
Options > General: Name of the Profile and Language
Options > Equipment: Telescope name/parameters as well as any GNSS and Planetarium software info.
Options > Imaging: Imaging and Meridian Flip parameters. I’ll move the image saving process to the D drive on this MeLE because that happens to be the location of the higher speed NVMe SSD.
Options > PlateSolving: Define the Plate Solver, Location of the executable, and the parameters.
Plugins > Available: Install any number of plugins you may want to use.
There will also be some amount of additional testing, autofocus configuration, etc that needs to take place. Watching my YouTube videos as well as using my new NINA Helper can be useful as you begin using your newly configured miniPC.